Take our brand new command palette for a spin by pressing ⌘ + P.
Like many things we do at BaseHub, the design and experience of this ⌘P was inspired by VSCode. Ideally, it feels as snappy!
Recent updates and improvements to BaseHub.
Move faster than ever with our brand new ⌘P menu.
Take our brand new command palette for a spin by pressing ⌘ + P.
Like many things we do at BaseHub, the design and experience of this ⌘P was inspired by VSCode. Ideally, it feels as snappy!
Solved the most frustraiting part of WYSIWYG editors, plus added formatting constraints.
We’ve pushed two improvements to our Rich Text Block.
Added an indicator to marks that tells you if you’re editing inside or outside of it.
Added a way to enable/disable specific formatting.
Note: “mark” refers to formatting that’s applied on characters, such as making something bold, or italic, or having inline code.
One of the most frustrating parts of WYSIWYG editors is the way marks work. Let’s say you have something marked as bold. Then, to go back and add something right before it, you’ll need to struggle with your editor sometimes adding the text inside of the mark (marking it as bold), or vice versa. This is how it works in Slack:
The whole thing is unpredictable and hard to explain, but we’ve all experienced it.
We had this same issue in our own Rich Text editor, and we simply couldn’t live with it. This is how you edit marks now:
Before this update, editors could apply any type of formatting to Rich Text Blocks. Headings, lists, images, videos, etc… were all available, always.
We heard from developers that sometimes it’s very useful to limit which formatting can be applied, so the rendering stays consistent. For example, you may want to limit blog posts’ contents to not support H1, and only support H2 and H3. Or you may not want to support tables, or videos. You get the idea!
Now, you can do so within the Rich Text’s properties panel.
The new editor layout sets the foundational stone for new screens and features. Let's see what it bring as of today.
The new README works as an initial screen to quickly see and edit useful info about the repository. You might noticed the old “Connect” page is embedded here now. We also have the possibility to edit the repository’s title and description, all in one place. The README is a special tab that functions as empty-state, wiki and quick kick off of the project simultaneously.
The new sidebar navigation involves some renaming of sections:
Explore
Previously “Content”, where your work in progress leaves, here you can access all your repo blocks and edit them.
Changes
Previously “Commit”, where you can see the diff between your WIP and the last commit tree.
History
Previously “Commits”, where you can access the full list of past commits since the beginning of the repo.
Tabs are now persisted between Explore, Changes, and History, which means you can have an open tab for a piece you’re editing, a tab showing the diff, and also a tab showing a previous commit, all in the same context.
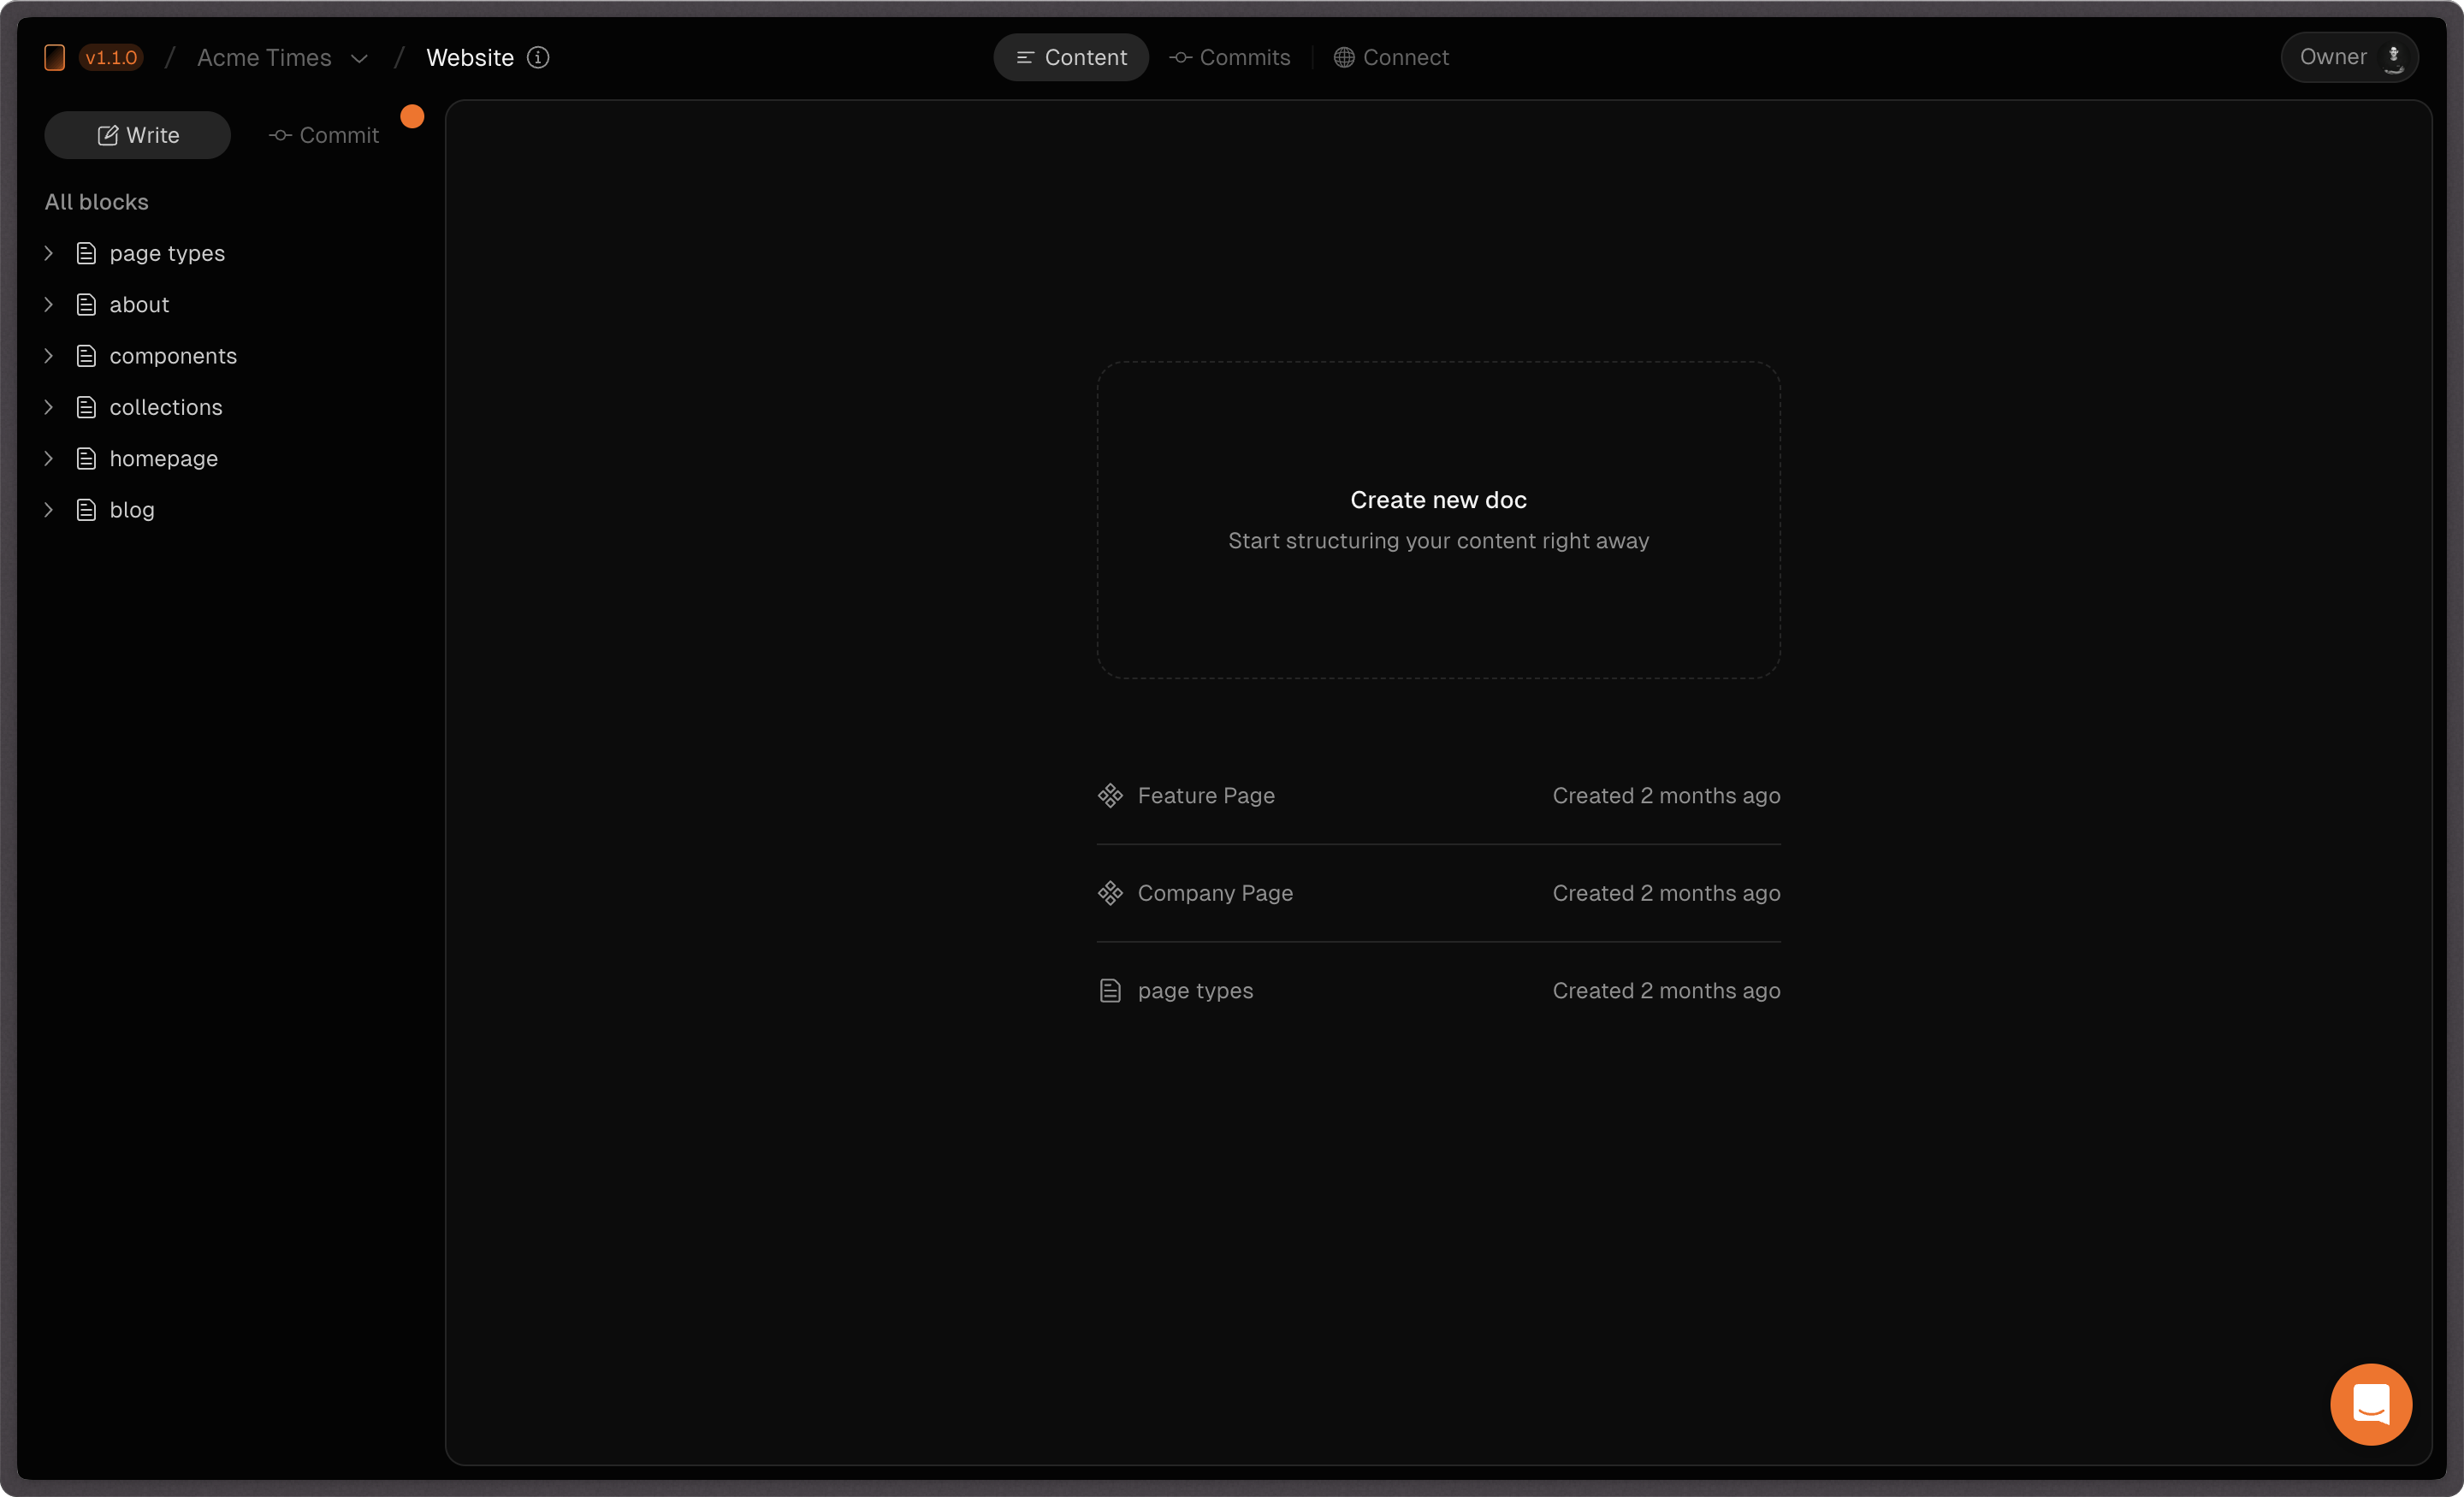
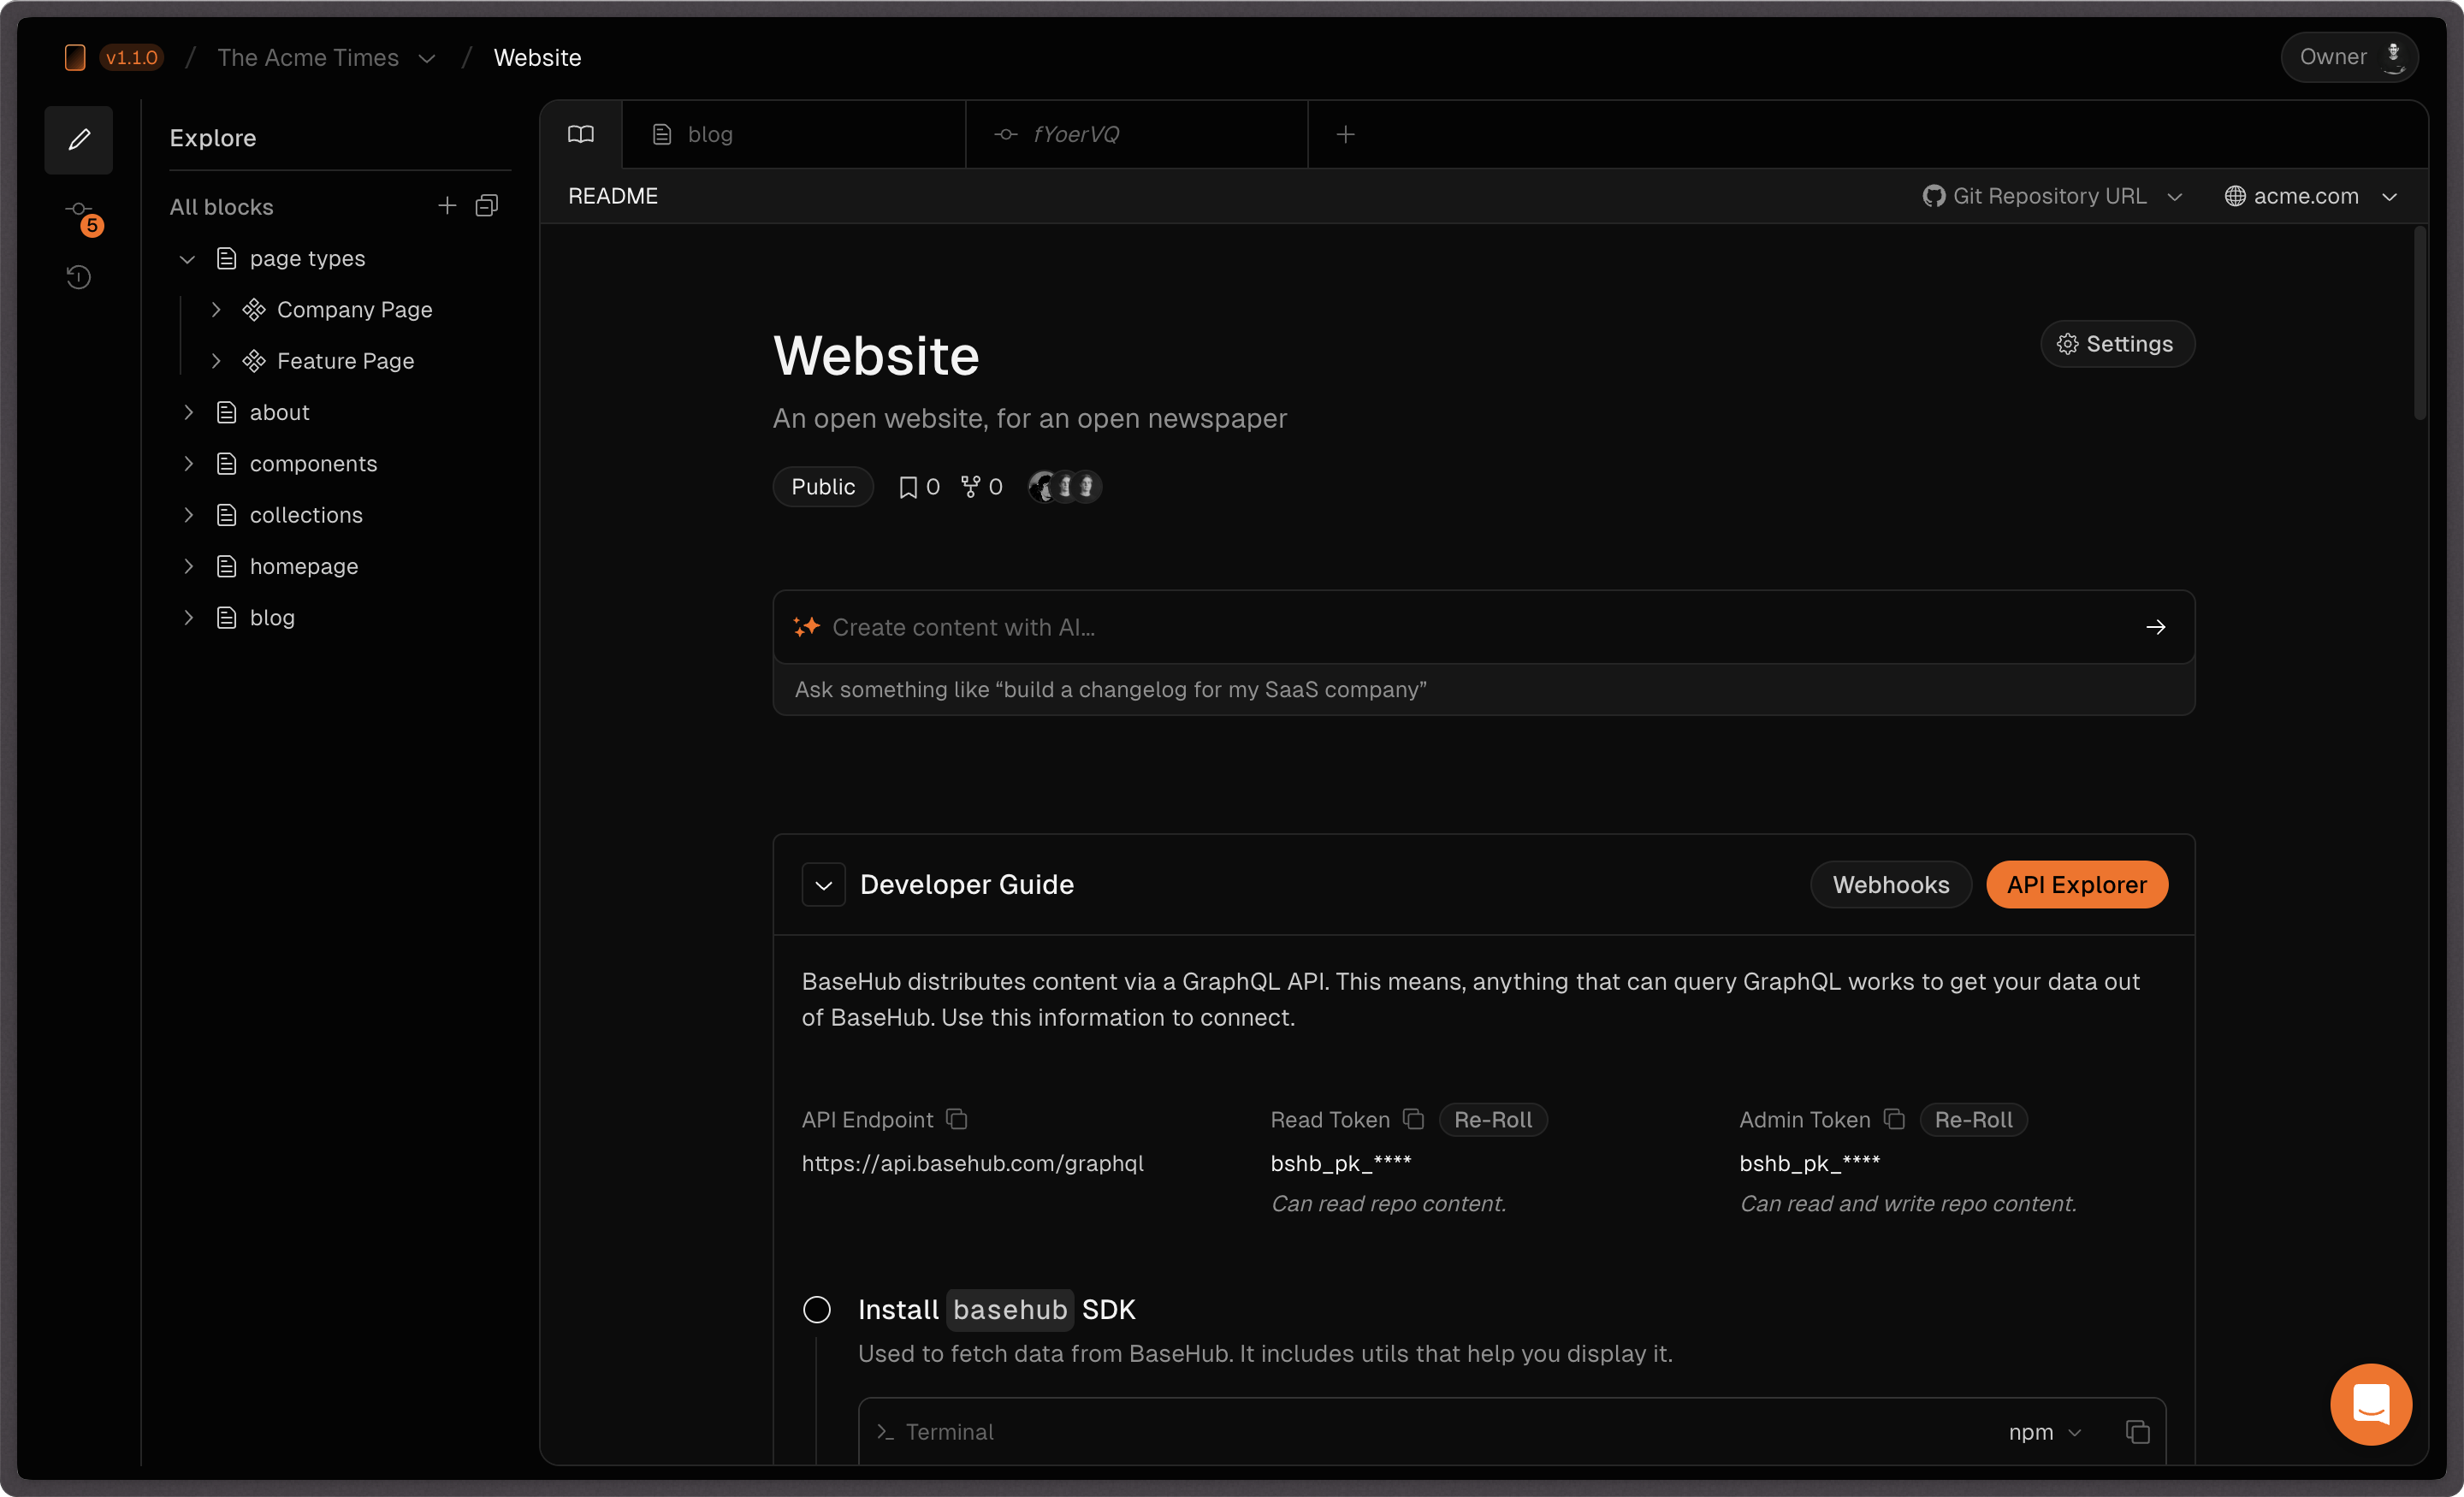
Overall, this redesign gives us a lot more space for adding new features without cluttering the UI. The header is now cleaner and well suited for our upcoming Branching selector, and the left sidebar has a lot of space for new panels.
You can now set Editor and Viewer roles for your team members, plus limit access per repository.
Last week, we introduced some major role management updates that advocate for a comfortable experience when leading with large teams.
In addition to the already known "Owner" and "Member" roles, we've introduced new role types aimed at addressing previously overlooked use cases. These four roles prioritize simplicity and ease of use in both UI design and tool functionality for every scenario. After all, why burden someone who simply needs to change copy with a needlessly complex user interface? It's important to ensure that editors and non-technical individuals don't alter the schema.
Owner
Has access to everything inside this repo. Can invite, grant or remove roles. Can edit, create, remove blocks and their properties. Anything that can be done in BaseHub, the Owner has the permissions to do it.
Member
Can edit, create, remove blocks and their properties. Can create and delete repositories. The highest role apart from the Owner, is the most versatile, without incurring in team management nor billing settings.
Editor
Can edit blocks and content; can add new collection instances. Think of it as a copywriter / marketer, they can add a post entry, or update a subtitle, or change an image, but they won’t be able to delete documents, or create new blocks that would change the API schema.
Viewer
Can view all the content, including hidden values and members settings. This is a less crucial role, but think of it as a guest that could check everything looks good, without needing to worry about modifying anything by accident.
Wanted to invite a new editor to the team but don’t want to share non-related repos? No need to worry, we have you covered now.
Introducing <Pump />, and our newly revamped Preview Workflow.
Pump is a React Server Component that enables a Fast Refresh-like experience for your content. When draft === true, Pump will subscribe to changes in real time from your Repo, and so keep your UI up-to-date. This is ideal for previewing content before pushing it to production. When draft === false, Pump will hit the Query API directly, without any production impact whatsoever. You can use it like this:
import { Pump } from "basehub/react-pump"
import { draftMode } from "next/headers"

const Page = async () => {
  return (
    <Pump
      next={{ revalidate: 30 }}
      draft={draftMode().isEnabled}
      queries={[{ __typename: true }]}
    >
      {async ([data]) => {
        "use server"
        return <pre>{JSON.stringify(data, null, 2)}</pre>
      }}
    </Pump>
  )
}

export default Page
Read more about Pump on our docs.
Additionally, we’ve revamped our Preview Workflow, adding a new “Preview” configuration and button. This will help developers configure Preview URLs for content editors to check out their content before publishing.
Read more about the new Preview Workflow in our docs.
Plus, you can format JS/TS code using Prettier.
We’ve revamped code blocks inside the rich text editor to include syntax highlighting for common languages. We’ve also worked on a quality-of-life improvement: code formatting. We know that writing a code example for your website can be tedious, so we hope these two improvements make your life easier.
Interact with your editor faster by using your keyboard.
In addition to the existing keyboard shortcuts, we have introduced several new keyboard navigation features to further enhance your experience while writing content. These features allow you to quickly and efficiently perform actions on your blocks without the need for a mouse.
You can now use the arrow keys, specifically the up and down arrows, to effortlessly navigate through your documents. This makes it easier to move between different sections or documents without having to manually scroll.
To toggle block focus, simply press Enter or Escape. This allows you to easily switch between blocks and focus on the specific one you want to edit or modify.
Deleting a block has never been easier with the introduction of the Cmd + Del shortcut. This allows you to quickly remove a block from your document without the need for multiple clicks or menu options.
To copy a block, press Cmd + C, and to paste it somewhere else, use Cmd + V. This makes it effortless to duplicate content or move it to a different section within your document.
Lastly, you can also cut a block by using the Cmd + X shortcut. This removes the block from its current position and allows you to paste it elsewhere, providing a seamless editing experience.
Copy-paste in between two repos is not currently supported, but in the roadmap!
With these improved keyboard navigation features, we aim to make the process of writing and editing content even more efficient and user-friendly.
We've added webhooks to BaseHub, starting with the Commit event. We're planning on adding more events soon.
Webhooks allow you to receive event notifications from BaseHub. BaseHub will send a POST request to a URL you specify when certain events happen in a BaseHub Repository.
BaseHub processes webhooks with Svix. The Svix integration was easy-peasy to set up, yet another example of great DX.
The only supported webhook right now is repo.commit. This is a useful notification that can help you set up on-demand revalidation for your Next.js Apps, amongst other things. Another common use case is search indexing: imagine you want to set up an Algolia integration, where you get content from BaseHub and index it into Algolia—at commit time is a great time to do so.
On the roadmap: We’re working on automatically indexing your content, thus supporting Search functionality via our API out-of-the-box. Stay tuned!
We’re working on adding more events into the mix, so stay tuned.
BaseHub is now open for everyone.
After a long and useful Alpha Phase, we’re now entering Beta. BaseHub is now reliable enough to support production workloads, although, as we move through our Beta, we’ll be monitoring how our infrastructure scales, we’ll work thorough potential bugs that may arise, and we’ll make progress on our roadmap. We’ll work hard towards General Availability.
As part of our Public Beta Launch, we're releasing the Diff View, our official Docs, and our Pricing Plans. Let’s go over these announcements.
The Diff View is a powerful way to see all the changes you've made across your whole Repo, so you can Commit them with confidence.
Give it a try, and please let us know if you have any feedback for it.
We shipped our Docs, one place in which you can get to know the Platform. We'll work hard to explain concepts in a simple manner, and add guides and examples for you to connect BaseHub to popular web frameworks. You can check out our guide for connecting to Next.js to get a hang of how our DX is!
We've built the Billing infrastructure that will let us provide the service sustainably. Now Teams can pay for BaseHub, and our pricing plans are as it follows:
Personal Account, starts completely for free, and includes:
One user, you
Discord Support
AI Assistant
375 Blocks, then $2.5 per 125
75k API Requests, then $2.5 per 25k
Team, starts at $29, and includes:
Unlimited users—bring your whole team to BaseHub
Discord + Email Priority Support
AI Assistant
500 Blocks, then $2.5 per 125
100k API Requests, then $2.5 per 25k
We’re beyond greatful for our Alpha Users. They provided us with valuable feedback and bug reports, and they’ve seen how we’re constantly improving BaseHub, one day at a time. Because of that, Alpha Users will be able to use BaseHub completely for free until 23 May, 2024. If you’re an Alpha User and you’re worried about this date or our pricing, don’t hesitate to reach out.
Discard working changes if you've made a mistake.
If you’ve made edits by mistake, you can now "discard all changes" to revert the working state back to the state it was at the latest commit.
Additionally, we’re working hard on building a brand new Diff UI that will help you see exactly the changes you’re about to commit. These are important steps that align with our vision for Open Content. Diffing, reverting, branching… are all on our radar. Stay tuned!
Often times, we’ll find ourselves wanting to render a Tweet in the body of our blog posts, or a callout, or any other thing specific to our website’s content needs that isn’t strictly formatting. Well, with this addition, now we can! Let’s see how.
To get started, we need to configure our rich text block to support a component. In this example, we'll create a Tweet component and configure it to be instantiated within the body of our blog posts.
Once we've created our Tweet component, we’ll select our rich text block and check “Tweet” in the “Allowed component types“ constraint. This will expose it in our rich text’s slash command.
Now, we can do /tweet to add a Tweet right in the body of our post. Additionally, we can use a custom component to “mark” a piece of text (like we do so when we make it bold or italic), available via the bubble menu. This is useful for adding custom popovers or tooltips to specific pieces of text.
<RichText /> componentTo render our custom components, we'll use <RichText />. We’ll install basehub via NPM, and import { RichText } from 'basehub/react'. This component is designed to facilitate the rendering of rich text data. It's straightforward to use and works well with TypeScript.
This is a small example of how we’ll use it alongside the amazing react-tweet to render static tweets:
import { notFound } from "next/navigate"
import { basehub } from "basehub";
import { RichText } from "basehub/react";
import { Tweet } from "react-tweet";

export default async function BlogPost({ slug }) {
  const { blog } = await basehub({ next: { revalidate: 60 } }).query({
    blog: {
      posts: {
        items: {
          __args: { first: 1, __sys_slug: { eq: slug } },
          _title: true,
          body: {
            json: {
              content: true,
              blocks: {
                on_TweetComponent: {
                  __typename: true,
                  _id: true,
                  url: true,
                },
              },
            },
          },
        },
      },
    },
  });
  const [entry] = blog.posts.items;
  if (!entry) return notFound();

  return (
    <main>
      <h1>{entry._title}</h1>
      <RichText
        blocks={entry.body.json.blocks}
        components={{
          TweetComponent: ({ url }) => {
            return <Tweet id={new URL(u).pathname.split("/").pop()} />;
          },
        }}
      >
        {entry.body.json.content}
      </RichText>
    </main>
  );
}
The body of the component fetches the data with basehub, and the return uses <RichText /> to render the data. Via components, we pass our custom renderers. It’s important to send through the blocks prop so that <RichText /> can match the references to the custom blocks.
This is just a quick overview of what you can do with custom blocks inside rich text. Expect more examples soon, as we ramp up our marketing and documentation efforts.
Oh, and by the way, we hope you enjoy our new Changelog!
A deeper dive on how we've solved "work in progress" in BaseHub.

A great feature of BaseHub is that stuff gets committed all at once, creating a snapshot of your repository at that point in time. We haven’t yet seen released the full implications of that git-like workflow, but it will allow you to:
See everything you’re about to commit, and choose what goes in or what gets restored to its previous state.
See past changes across your whole repository, or across a single document, and revert if you made a mistake.
Create branches to work on new stuff without affecting production.
And a lot more.
Now, one inconvenience that “committing everything together“ brought, was that you would struggle to create “work in progress” content, cause you were obliged to commit it, and therefore expose it to the API. Not only that: if you are rigorous with your constraints (which you should), you’d get a bunch of “is required” errors when attempting to commit, and you’d be forced to either lower the constraints, or enter in dummy data.
That’s why we created the “hidden” state. A hidden block will not be exposed via API, and will skip commit validation. You can hide a block via the properties panel, or via the sidebar. You can only hide documents, components, and instances; and nested components/instances inherit hidden state from its parent for convenience.
This is not the same as the “draft/published” workflow that other systems offer. Our “hidden“ state is something that needs to be committed, meaning, everything that gets committed passes the validation you’ve set up, always. The fact that, in other systems, publishing is controlled per-entry makes it easy for users to enter an incorrect state. If you’ve started with loose constraints and at some point decided to tighten them up, then you may have fields that are “required” but that return null from the API. While this might seem like a small thing, this means that their GraphQL APIs can never be sure if a required field will actually return content, therefore struggling to be strict with their types, and therefore making developers be really careful with every piece of data they get from the CMS. This is no good.
In BaseHub, we know that if something has been committed, and is required, then it absolutely has a value. We type it accordingly, and developers can work with types that make more sense.
Additionally, content creators can have their “work in progress” in their CMS, instead of just doing data entry once it’s done.
This was a deeper dive on how some features that might seem similar, were actually thought of from first principles, and an ode to the git philosophy and its ever-evolving implications. As always, let us know what you think on Discord, or on X.
We’ve been busy these couple weeks, and we've packed a lot of new stuff with this update.
BaseHub's been real-time from the start, but now, you'll see presence indicators ala Figma when someone is working with you in the same repository.
We're working on more Sharing features, such as inviting read-only Guests to facilitate getting feedback on your content!
You now can right-click a block and "Wrap in collection" to create a collection and place that block inside of it. For example, say you have an "Author" Component which you instantiate a couple of times, but now you realize you want to order them in a single Collection. Now, with just a couple of clicks, you can do so easily!
We've made several infrastructure improvements to our Delivery API, making it faster and more reliable. We're committed to keep lowering those milliseconds.
The new "Select" Block let's you define a constrained set of options and choose one (or multiple) from those. It also looks great! Try it out with /select.
We've dramatically improved our structure generation, making it much more helpful than it was before. It now generates better structures, and adds placeholder to it. Try it out with a prompt like "a landing page about Lionel Messi".
We now display the Collection's Template component in the sidebar, so navigation is clearer.
We've added support for Tables inside the Rich Text Block.
We've made sure we don't expire the generic Team Invite Link, so you can invite all your coworkers with just one link.
We've added the functionality to "re-roll" your API Key, just in case it gets compromised.
And some quality of life improvements.

A common CMS workflow starts with you creating a Repository in your Personal Account; then, as it grows, you might need to create a Team and invite your coworkers; by then, you might want to transfer that repo from your Personal Account to your Team: well, now you can! And with zero downtime.
You can now "Add block below" in your editor.
We've added Tab reordering + Tab closing context menu.
We've added an option to open the Rich Text Block in a new tab: useful for editing large pieces of content.
You can now collapse the sidebar for a full editor experience.
We're making our API faster.
We've added feedback collectors to the Text Al Assistant to continuously improve our generation.
Collaborate with your coworkers on content, in real time.
We've shipped Teams, so now you'll be able to collaborate with your coworkers on content, in real time. Look for the Team Switcher in the Header (top right) in order to create one!
Note: Teams are free during Alpha, as we figure out pricing, but we'll probably charge for them in the future. Rest assured, we'll never charge you for something before notifying directly to you.
Blog Template. We scaffolded a quick new Blog template. Look for it in while creating a new Repository.
We'll be working on Multiplayer Presence UI.
We're prioritizing a feature for transferring repositories from one team to the other, so you'll be able to start on your personal account, and upgrade if/when needed.
Docs are still in the works; hang in there!
This is the first issue of our Changelog, where we'll announce new changes to the BaseHub platform.

Now you get an automatic _slug field for each block, with guaranteed uniqueness at the nesting level its in. You can always create your own "Slug" Block (text block with regex validation), but this is a great alternative to take into account when creating UI for a Blog, or similar.
// _slug is another key in your Block:
basehub().query({
  posts: {
    items: {
      _slug: true,
      ...moreFields
    }
  }
})Our brand new Onboarding template brings new users right into "The BaseHub Way", by teaching the basics of BaseHub. Check it out when creating a new repository!
Note: to build the onboarding template, we had to build a new "template engine" which is the first step into creating more templates in the future.
We've launched a new popover to generate text. For now, it supports text fields only, but we'll work on generating Images, and improving the suggestions overall.
We've started working on Docs.
We're really close to shipping Teams + Multiplayer.